
Welcome to this latest edition of Corgi Diecast Diaries, your regular blog review of all the news, updates and topical stories from the captivating world of Corgi die-cast model collecting.
We have another bumper current Corgi project update for you in this latest edition of our blog, as we check up on the progress of some of the most eagerly anticipated models across our various ranges. With a huge number of exclusive images to share with you this time, we would ordinarily cherry pick the most appealing pictures to include within our blog, but this selection is so good that we will be letting you see every one - prepare yourselves for a diecast model image feast.
We begin by looking at three of the forthcoming Aviation Archive models due to take their places in our Strike East range, a series of model releases intended to mark this year’s 80th Anniversary since the start of Operation Barbarossa and Germany’s invasion of the Soviet Union. We will be taking a look at the final samples of all three featured models, each one of which will make a stunning addition to any model collection. We follow this up with a reader supplied feature and some exclusive images showing a real versus Corgi situation concerning a recently released post war jet wearing a rather distinctive livery - you will not want to miss these!
Next, we feature our scale diecast modelling tribute to arguably the most famous individual tank the world has ever known, as we bring you details of how our team produced the box artwork image which will accompany the release of ‘Tiger 131’ and staying with the subject of box presentation, we release the forthcoming ‘Kraken Bus’ by showing its new box artwork and the impressive work our development team have done in making this one of the most striking 1/76nd scale buses we have ever produced. Finally, and in a break from our recent format, we will not be conduction one of our virtual warehouse sweeps, but will instead bring you exclusive images of ‘Witchcraft’, our scale tribute to an airborne warrior from the Second World War and one which completed an impressive 130 missions. With diecast delights galore for your delectation, we had batter make a start straight away.
Diecast air armada incoming. This trio of Strike East Luftwaffe models are due for release within the next few weeks
Operation Barbarossa was an ambitious German plan to launch an unexpected invasion of the Soviet Union in the summer of 1941, in an attempt to protect Hitlers vital oil fields in Romania and to secure territory and natural recourses to fuel the gluttonous German war machine. Originally, Hitler had intended to take all of Western Europe before turning his attentions east, which included either the surrender or invasion of the British Isles, however, as he was becoming increasingly restless about the Soviet threat, by the summer of 1941, he had decided he could wait no more. Forced to delay the strike by several weeks due to having to send his forces into both Yugoslavia and Greece, this delay would have disastrous consequences for German troops in the months which followed invasion, as the anticipated quick victory failed to materialise and the harsh Soviet winter took hold earlier than usual that year.
Committing around 150 army divisions to the invasion, backed up by 3,000+ tanks, thousands of artillery pieces and over 2,500 aircraft of all types, this would be the most powerful invasion force the world had ever seen, but it was just as well - outnumbered from the start, it was thought that the Soviet armies they would meet had a numerical advantage of 3 to 1 and German military planners were unsure as to how many reserve divisions the Soviets could call upon. With the previous successes of Blitzkrieg behind the Germans, the scene was set for the most catastrophic clash of military might in history and the world braced itself for a significant escalation in this second global conflict.
When the Corgi team were planning the 2021 many months ago, we knew that the 80th Anniversary of the start of Operation Barbarossa was something we would like to mark within our Aviation Archive range, however, this would not be without one or two challenges when it came to researching details. The actions which followed the launch of this monumental operation actually only lasted for a period of less than six months, with the Soviet Winter Offensive and harsh conditions stalling what were up to this point, quite significant German territorial gains. From this point until the end of the war, the various Eastern Front campaigns would descend into attritional conflict, with both sides suffering horrendous losses, but the Soviets referring to it as the Great Patriotic War - soldiers on both sides would refer to it in much more sinister tones, as at times it seemed like everyone posted there would ultimately perish.
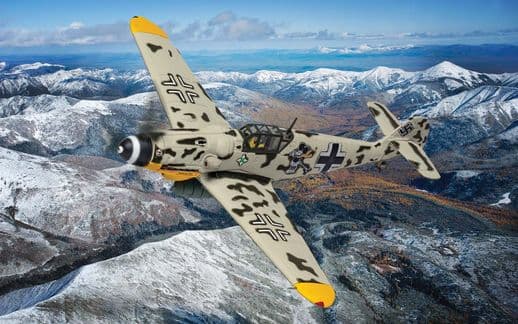
Our new Aviation Archive ‘Strike East’ range models benefit from this stunning box artwork presentation and a new sub-range logo. This model is the ground support Messerschmitt Bf 109E-7/B AA28007
At the start of Barbarossa, most of the aircraft assigned to the various Air Fleets taking part would be wearing similar camouflage and markings to those seen earlier during the war in the West and as the attack against the Soviets was assumed to have secured a decisive victory in just a few short months, plans to fight a winter conflict had not really been considered seriously. For most people, the air war on the Eastern Front is synonymous with aircraft daubed with winter whitewash, in an attempt to gain as much camouflage protection as they could in this frozen landscape, particularly following the resurgence of the Soviet Air Force, which left us with a bit of a problem. As the war in the East would rage for almost four long years, but Barbarossa itself only historically lasting for six months, calling our 2021 Aviation Archive subrange a ‘Barbarossa Collection’ would be both extremely limiting from a subject aircraft perspective and potentially historically inaccurate. For that reason, we decided to base this new range around the ‘Strike East’ title, something which would allow us to include aircraft which fought in this theatre from the start of Operation Barbarossa, right up until the end of the war.
With six models planned for our Strike East range, the first release came as something of a surprise for many collectors, as Messerschmitt Bf 110F-2 AA38510 was announced as an ex-catalogue web exclusive, however, this beautiful model served to put us all on standby for the imminent release of other appealing models in this series. It also allowed us to unveil the new box artwork and logo designs our talented Graphic Designer had been working so hard to perfect. We are delighted to confirm that our Strike East Bf 110 will soon not be alone in the range and that a veritable scale air armada is waiting in the wings to join it. All three of the models we are about to feature represent final product samples of each release and we would therefore hope that they would be due to arrive in our warehouse over the next few weeks, Let’s take a closer look at our Luftwaffe Strike East model trio.
AA27110 – Messerschmitt Bf 109G-6 Black Double Chevron ‘Mickey Mouse’, Hptm. Horst Carganico, CO II./JG 5, Pskow South Airfield, Soviet Union, Early 1944
As the Luftwaffe prepared to launch their attack against targets in the Western Soviet Union at the start of Operation Barbarossa, they knew they would be facing the largest air force in the world and if their initial strikes were not effective, the supporting ground offensive would come under heavy Soviet Air Force attack. In a stroke of genius, the Germans, knowing many of their crews were relative combat novices and would be flying over vast, unfamiliar terrain in darkness whilst executing their crucial initial strikes, ensured their most experienced pilots and navigators were spread evenly amongst their Air Fleets in preparation for the attack, thus giving their Soviet Blitzkrieg the best chance of success. The Luftwaffe’s objective for the opening phase of the attack was the annihilation of the Soviet Air Force and complete supremacy of the air above the advancing ground troops - anything less than complete success could result in a military disaster.
At their disposal, they had 2,770 aircraft of all types waiting at bases close to the Soviet border, aircraft which were amongst the best in the world, crewed by highly trained airmen. It is difficult to estimate the size of the VVS which faced them at that time, with some estimates putting the figure as high as 14,000 aircraft, although not all of these would be stationed in the initial attack sectors. Significantly, German intelligence reports at the time suggested that less than 4000 of this number were ‘First Class’ combat machines and that a staggering 80% were actually considered obsolete types. The scene was set for an aerial showdown which would totally eclipse the Battle of Britain which took place the previous summer.
This next series of images are blog exclusives and show different views of an advanced production sample of this distinctive new Messerschmitt
Born in Silesia in October 1917, Horst Carganico was already a pilot with Jagdgeschwader 1 at the outbreak of WWII and would see his first combat action against the RAF whilst flying from Luftwaffe bases in Norway. Despite this, it would be on the Eastern Front where Carganico would have his greatest success as a fighter pilot, taking an active part in Operation Barbarossa and claiming at least 20 aerial victories by the end of September 1941. In the six weeks from the beginning of April 1942, he would go on a scoring run which would see him claiming a further 23 victories, but as Soviet fighter effectiveness began to improve steadily during the year, he would not have everything his own way. On two separate occasions, he would be brought down over Soviet territory following combat with the VVS (Soviet Air Force), luckily managing to evade capture and return to his unit both times.
Carganico was known for adding his personal ‘Mickey Mouse’ emblem to the majority of the Messerschmitt fighters he flew, including the rather elaborate example which adorned this II./JG.5 machine, which surely made this one of the most distinctive fighters on the Eastern Front. He would survive the savage fighting in the East only to be killed in May 1944 whilst engaged in combat with USAAF fighters over Saint-Dizier - attempting a forced landing in his damaged aircraft, the fighter struck high tension cables and crashed. Carganico posted an impressive combat record of 60 confirmed victories from a total mission count of around 600 sorties, mainly on the Eastern Front.
AA36713 – Junkers Ju88 A-5, F1+AS, 8./KG76, Orscha-Süd, Russia, December 1941 Operation Barbarossa Air War
Although the opening phase of Operation Barbarossa appeared to be an almost unimaginable success for the Germans and a crushing defeat for the Soviet Union, the fighting on the Eastern Front would prove to be a crucial turning point in the eventual outcome of the Second World War and one from which Germany could never recover. The initial decimation of the Soviet Air Force only served to organise a people who were a sleeping military giant, stepping up the production of new aircraft and tanks far out of the reach of Luftwaffe strike bombers and keeping the Germans occupied until they were in a position to strike back. With the initial plan of defeating the Soviets inside three months in tatters and despite Barbarossa possibly being the most effective illustration of Blitzkrieg ever deployed, the invasion of the Soviet Union failed to meet any of its major objectives and descended into a costly war of attrition the Germans were ill-equipped to overcome.
As the first Russian winter set in and German troops quickly realised how poor their supply lines were, the Russians were stepping up the re-supply and replenishment of their own forces, enabling the massive Soviet army to do their patriotic duty. In the words of one German general, attacking the Soviet Union was like an elephant attacking a host of ants. The elephant will kill thousands, perhaps millions of ants, but in the end, their numbers will overcome him and he will be eaten to the bone. The Germans would lose almost six times more troops on the Eastern Front than they did on all other fronts combined during WWII.
As before, these beautiful images herald the fact that we can all start getting a little excited about this stunning new model, as it has filed its flight plan and it’s heading our way!
As arguably the most versatile German aircraft of the Second World War, Luftwaffe Junkers Ju-88 units were probably the most capable strike assets they had available at the start of Operation Barbarossa and they would be used extensively throughout the campaign. During the opening attack in the early hours of 22nd June 1941, hand-picked, experienced Ju-88 crews were sent as pathfinders to ‘light up’ the Soviet airfields closest to the western edge of the invasion, illuminating targets for the main attack force which followed just minutes later. Immediately returning to their bases, they were refuelled and loaded with standard bombs, so they could head back to the target airfields and participate in the rout of the Soviet Air Force.
In other sectors, the Ju-88s of KGs 76 and 77 reported the inexplicable loss of several experienced crews, losses which have since been attributed to friendly fire incidents during the melee of the initial attacks. As the German invasion gathered momentum, Ju-88 units would be constantly employed in attacking Soviet airfields ahead of ground units, but would also become extremely proficient at targeting Soviet troop and armour concentrations which were threatening the flanks of advancing German columns. This attractive 8./KG.76 Junkers Ju-88 came down behind German lines during the early winter of 1941, probably due to engine trouble, as it was later recovered and returned to operational condition. Looking resplendent in its winter whitewash, it also features the distinctive wasp emblem of the unit on its front fuselage.
AA32519 – Junkers Ju-87B-2 Stuka ‘Ghost Bones’, T6+GL ‘Bones nose art’, 3./StG.2 ‘Immelmann’, Battle of Moscow, December 1941
During the opening actions of Operation Barbarossa, the feared Stuka dive bomber was not used as heavily as you might initially think and for one very good reason, speed (or the lack of it). Although the Germans had the element of complete surprise on their side, they knew that the Soviet Air Force would immediately attempt to counter the German offensive, or to withdraw their aircraft to bases out of reach from German air attack - neither of these could be permitted. With the first attacks taking place shortly after 3am on 22nd June 1941, relatively small numbers of bombers were initially sent against multiple airfield targets, each one equipped with fragmentation and incendiary bombs intended to cause confusion on the ground and preparing the way for the main strike force which would follow just a short while after.
With the Soviets caught completely off guard, many airfields still had their aircraft neatly lined up in rows, not even dispersing them around their fields for protection - the Luftwaffe could hardly believe their luck. By the time the Soviets realised what was happening, the drone of the main attack force was already approaching and the unfolding catastrophe could now not be averted. With a lack of Soviet fighters in the air, even the covering German Messerschmitts could join in the carnage on the ground and within a few hours of the offensive starting, the Soviet Air Force had lost several hundred aircraft, many before they even had the chance to start their engines.
One of the most intricately decorated Stukas we have ever attempted, this one is a real beauty and one which will surely find favour with Aviation Archive collectors everywhere
Without doubt one of the most instantly recognisable aircraft of the Second World War, the Junkers Ju-87 Stuka may not have been the most effective strike aircraft to see combat during the conflict, but it was certainly one of the most feared. Capable of providing strategic, precision bombing support for advancing Wehrmacht ground units, the Stuka heralded the coming of war and as such, had been designed specifically to instil fear and confusion into enemy troops and the terrified population at large. Attaching a wailing siren, known as the ‘Jericho Trumpet’, to one of the undercarriage spats on the Stuka’s airframe, only served to enhance the reputation of this aircraft, with its distinctive gull wings coming to represent the fearsome manifestation of Blitzkrieg!
Although the Stuka had been found to be vulnerable against the modern fighters of the Royal Air Force during the Battle of Britain, it would go on to play a significant role during Operation Barbarossa, where its precision strikes were used to clear a path for advancing ground units along the vast front line. This 3./StG.2 Stuka wears the standard camouflage of Black/green and Dark green over light blue, but has a roughly applied winter distemper to give it additional protection whilst operating during winter conditions. It also features a representation of gaping mouth artwork over the air cooler and above, which is described as ‘Ghost Bones’, making this one of the most distinctive Stukas to serve on the Eastern Front.
This stunning trio of models will make a fitting scale tribute to Operation Barbarossa 80th and the story of the Eastern Front Air War and will be welcomed into many a model collection over the coming weeks.
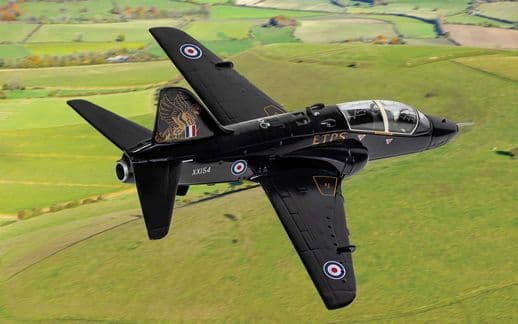
With grateful thanks to Chris Hodson, the aircraft’s owner, these magnificent pictures were sent to us following the release of our latest BAe Hawk T.1 model, one which pays its scale respects to one of the most historic aircraft in Britain today
The launch of any new Corgi catalogue can often be something of a double edged sword for many diecast collectors. Sure, we are all excited to see the latest selection of models due to be released over the coming twelve months, but also, we have to make the difficult decision on which models are a must for our collections and which ones we are reluctantly going to pass on. Of course, we will all have our particular collecting themes which can usually be relied upon to tempt us, but every now and then, there is a model included in the range which proves totally irresistible to a great many collectors, even managing to traverse traditional and long standing collector range boundaries, to take its place in people’s collections. For the current 2021 range, one model which most definitely managed to do that was AA36016 - British Aerospace Hawk T.1 XX154 in its smart black and gold Empire Test Pilots School livery, a model which has just been released and is a fitting tribute to a truly historic aeroplane.
The aircraft is currently cared for and is on display at the Boscombe Down Aviation Collection, which is based at Old Sarum airfield, in Wiltshire and she is owned by Chris Hodson, who’s father Gordon was Head of preliminary design for the Hawk programme and was instrumental in driving its development. Thanks to Chris, we are able to share this exclusive series of images which not only show the actual Hawk XX154, but also with its recently released 1/72nd scale Aviation Archive diecast tribute.
AA36016 – British Aerospace Hawk T.1 XX154, Pre-production aircraft, Empire Test Pilots School, Boscombe Down, Wiltshire, August 2019 – Aircraft now with the Boscombe Down Aviation Collection at Old Sarum
Without doubt one of the most historic British jet aircraft of the post war era, British Aerospace Hawk T.1 XX154 is the first prototype airframe of an aircraft type which would go on to be hugely important to the British military, whilst at the same time becoming a stunning export success for the British aviation industry. Making her first flight from Dunsfold airfield on 21st August 1974, XX154 would spend her entire service life as a test and development aircraft, helping to ensure that this magnificent training aeroplane reached its full potential - with over 1000 aircraft built to date, she certainly excelled in this task. Spending time with such famous units as the Royal Aircraft Establishment and the Aeroplane & Armament Experimental Establishment, XX154 would spend the final 20 years of her service life with the Empire Test Pilots’ School at Boscombe Down and after undergoing her last major service, she was given this smart black colour scheme, in recognition of her service. Also wearing a representation of the ETPS crest on either side of her tail, a gold coloured Griffin, XX154 would end her flying days as one of Britain’s most attractive military aircraft. When this very special aeroplane made her final flight in December 2018, she had clocked up an impressive 6000 flying hours, the limit imposed for original Hawk airframes. This hard working aircraft was making a valuable contribution to the British Military right until the end.
The ultimate modelling mark of respect, our recently released Boscombe Down Hawk XX154 pictured on the actual aircraft. Thank you to Chris Hodson for kindly sending us this magnificent selection of images - we are so pleased that you like her!
Although we stated previously that prototype Hawk XX154 made her final flight from Boscombe Down airfield in December 2018, that is not entirely true. That flight may well have been the aircraft’s last flight under her own power, but she was to take to the air one final time in rather unusual circumstances. With her airframe fatigue life expired and with this magnificent Hawk possessing real historic importance, it was decided that she should be placed in the care of the Boscombe Down Aviation Collection, which is based at Old Sarum Airfield. Rather than transport the aircraft the short distance to Old Sarum by road, discussions gathered momentum about potentially arranging a form of transportation befitting an aircraft of this pedigree. On the afternoon of 21st August 2019, a Boeing Chinook HC.6A from RAF No.27 Squadron at Odiham arrived at Boscombe, determined to let this famous Hawk feel the wind beneath her wings just one final time, as the helicopter transported the aircraft the short distance to Old Sarum as something of a rather unusual underslung load. The date chosen for this re-location flight was also significant, as it was exactly 45 years to the day since this pre-production Hawk had made its first flight from Dunsfold. With the BAe Hawk success story continuing to this day, it is fitting that this historic first aircraft will now be preserved as a unique piece of British aviation heritage for posterity.
We would like to sincerely thank Chris for kindly sending us these magnificent images and for allowing us to share them with our readers. We are delighted that we managed to produce a fitting scale tribute to a historic aircraft which means so much to him and his family.
The re-introduction of our 1/50th scale Military Legends range with the launch of our 2019 model range was not only a welcome development for die-cast collectors, but also something the Development Team here at Corgi had been hoping could happen for some time. After an enforced hiatus of tend years and the knowledge that these beautiful models had never actually been produced since the Corgi brand had come under the protection of Hornby Hobbies, we knew there would be much work to do if this was to be a success. Firstly, the individual toolings themselves would have to be located and assessed, ensuring that all the necessary component tools for each model were still held and were in good condition. Next, each one would have to be used to produce test shots for assessment and if ant tooling modifications were required, these would have to be identified, costed and actioned before any actual range development work could begin.
We have to say that in all honesty, this entire process was not without its challenges and at several points it did look as if the project could still be derailed, however, we persevered and with a little bit of luck thrown in for good measure, we finally welcomed the first Military Legends test shots to Corgi HQ, which was a really good day for the team. The one thing we all wanted to achieve when welcoming these model back into the Corgi fold was to make them as accurate and collectable as they could possibly be and again whilst this may have taken a little while before things met with our expectations, we are delighted to say that our Military Legends are definitely now firing on all cylinders.
In the 80th edition of our blog, we brought you details of the latest release in this impressive range and the latest in our popular Panzerkampfwagen VI ‘Tiger I’ series, one which is the first to benefit from a representation of the Zimmerit anti-magnetic paste which was applied to many German tanks and assault guns from 1942 onwards. This model is definitely taking us into the authenticity territory we want to be in with this range, however, she was not the only new ‘Tiger’ to be announced for the range at the beginning of this year!
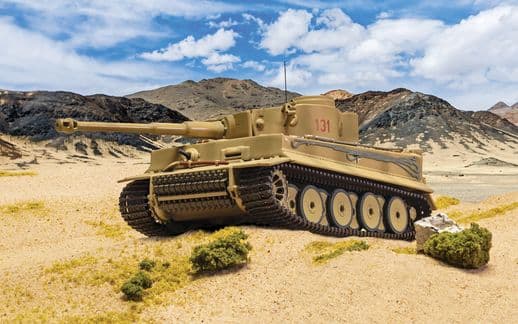
If you ever find yourself in the tranquil countryside of south Dorset and fancy engaging in a little ‘Tiger hunting’, there is a little museum at Bovington which houses a world famous collection of military vehicles and amongst its number is what many people regard as the most famous tank in the world, ‘Tiger 131’. A battlefield behemoth which was the most powerful tank in the world when it was first introduced, the Tiger was the tank against which all others would be judged and as such, the Allies were desperate to get their hands on one. This particular example was an early incarnation of the mighty Tiger I and was captured by British troops only days after it was committed to combat in Tunisia in 1943, but how did it get from there to being in a British museum 78 years later?
CC60515 – Panzerkampfwagen VI Tiger Ausf E (Early production), ‘Tiger 131’, Schwere Panzer-Abteilung 504, Point 174, Gueriat el Atach, Tunisia, 24th April 1943 - ‘To catch a Tiger’
Built at the Henschel tank works in Kassel during February 1943, Panzerkampfwagen VI Tiger Ausf E ‘Tiger 131’ was destined to be one of only a small number of Tiger tanks sent by Hitler to bolster the increasingly desperate situation in North Africa, reinforcing the famous Afrika Korps. Assigned to the 504th Heavy Tank Battalion, she was transported from the factory by rail to the port town of Trapani in German occupied Sicily, before being shipped across the Mediterranean Sea to Tunis by barge, three tanks at a time. Once in Tunisia, the Tiger was prepared for immediate combat operations and as it was destined to be the commanders tank of the 3rd platoon, was adorned with the red turret number 131.
Joining up with what few existing Tigers remained in the area, the tank went into action against British forces in April 1943, where she would be facing the Churchill tanks of the 48th RTR and determined ground forces, which at that time were very much in the ascendancy. Although the 88mm main gun of the Tiger was capable of destroying a Churchill at ranges well beyond the British tank’s ability to return fire effectively, this advantage was negated by the hilly terrain in which they would be fighting. The Tigers would therefore usually be deployed with several smaller Panzer IV tanks and additional supporting infantry units, vital in providing close protection for these battlefield monsters. Unfortunately for the men of the Afrika Korps, this would all prove to be a case of too little, too late.
This trio of images show how our photographers and graphic designer took the sample model and used it to produce eye-catching box artwork to support the release of a model which will surely be one of our most popular models of the year
Facing overwhelming odds in Tunisia, the newly arrived Tiger tanks of Schwere Panzer-Abteilung 504 travelled around 400km from their disembarkation port of Tunis to first face the British in actions around Djebel Djaffa, however, this would be a period of intense fighting and combat accounts are a little sketchy, to say the least. What happened to Tiger 131 next is still shrouded in mystery and the subject of continued military research. Whilst engaged in fighting with troops of the 2nd Battalion, Sherwood Foresters at Point 174 Gueriat el Atach on 24th April 1943, Tiger 131 was hit multiple times by small arms fire, but significantly, also by an anti-tank shell from a gun captured by the British only minutes earlier and turned against its former owners. The round glanced off the gun mantlet and struck the turret ring, jamming the turret and probably injuring the crew in the process.
Shaken up and probably fearful of coming under further attack, the crew quickly abandoned the tank and ran towards German lines, leaving their almost pristine new Tiger I in the middle of the active battlefield. The Foresters attempted to hold on to their unexpected prize in the face of numerous enemy counterattacks, but it would be several days before the area could be secured and British tank recovery crews could safely enter the area and recover the tank. Tiger 131 was the first German Tiger tank to be captured intact by Allied forces during the Second World War and in the years which followed, would not only be the subject of detailed examination, but would also go on to be regarded as probably the most famous individual tank in the world.
The images shown above illustrate how our photographers and graphic designer used a pre-production sample of this stunning new model to create the image which would grace the box top of this forthcoming release, using the story of its capture back in 1943 as their inspiration. The three separate stages show the original model image, the picture after it had received some attention in photo editing software and finally, how our graphic designer used it whilst conforming to all current brand style guidelines to create the box we will all soon become so familiar with.
The eagle eyed amongst our readership will no doubt spit that the actual catalogue and website image used for this model is wrong in a number of ways, however, as this was taken very early in the development of this model last year, it was only ever intended as a holding image and one we knew we would be updating. The actual model has been the subject of some concerted and rather impressive development, with several sample models produced as we perfect what is a really important addition to the Military Legends range. The fascinating development of our ‘Tiger 131’ model is a blog story in itself and one we look forward to telling in a forthcoming edition. For now though, we hope you have enjoyed seeing these box artwork development images, proving that this spectacular new model is cruising towards its Autumn release. Already looking like a sell-out before release, please take a look at the product webpage to see it this isn’t one model you might need to consider pre-ordering - you don’t want to miss out on this classic.
A highly limited release, this latest Kraken Routemaster Special Edition will benefit from a new box sleeve befitting a collectable release of this distinction
Our Original Omnibus range has long been praised for some of the spectacular liveries we have applied to many of our release, but surely there can be few which can claim to be as attention grabbing as our stunning Kraken buses. Each one a little scale piece of diecast modelling art, these highly collectable buses are linked to an incredibly successful brand presentation campaign unveiled in the Angel tube station, where advertisers created an imaginative transformation of the public access tunnels into the lair of the Kraken sea monster, in support of this brand of black spiced rum. The campaign proved so successful that it is reported that pubs and bars in the vicinity of the station reported an impressive 80% increase in sales of Kraken rum, in the weeks following the unveiling of the station makeover.
In an extension of this successful campaign, it was decided to adapt this impressive design to feature as distinctive graphics wraps applied to new Routemaster buses, with the massive tentacles of the beast appearing to crush the bus, causing the windows to smash. This visual treat was all achieved by taking advantage of the latest vehicle graphics technology and the clever use of one way vision film on the windows and five separate buses were to benefit from this eye-catching presentation. Despite the complexity of the design applied to these Kraken buses, the work to transform all five vehicles was completed within three days, but surely resulted in models of public transport that everyone would want to take a ride on.
Having successfully introduced several previous releases of these beautifully presented new Routemaster buses into our Original Omnibus model range, we have been delighted to see our collectors using words like Striking, impressive decoration and a work of art, when describing these models, after placing them in their display cabinets. Collector’s may have been surprised to see the Kraken Bus making a reappearance in the current catalogue, but there is a very good reason for that, we just keep being asked to produce more by our retail partners, as they are always being asked for the models. In an attempt to plicate both stockists and collectors, we decided to produce a further Highly Limited run of dual destination Kraken Routemasters, with both benefitting from even greater levels of decoration detail and new bespoke packaging with will not only make them incredibly collectable, but also very different from any other models in the Original Omnibus range.
The three exclusive images we are showing here all feature the distinctive new special edition box sleeve which will accompany the release of these new dual destination Kraken Routemasters, models which once again are already proving to be popular and are likely to disappear as soon as they are released. The product description for OM46638A Wrightbus New Routemaster ‘Release the Kraken’ Special Edition Route A reads - Introduced in 1999 and providing service between Streatham Hill and Euston, route 59 is contracted to Arriva, and remains in operation. Ending at Russell Square via Brixton, the route provides vital service to Kings Cross and Waterloo. With a fleet of 26, the New London Routemaster was introduced to the route in 2016, with door modifications made in 2020 to deter fare evasion. Spread across five vehicles, Kraken Rum’s advertising campaign saw Routemasters adorned with and ‘crushed’ by the creature. Corgi are proud to release a special edition Kraken livery, complete with bespoke box sleeve.
The story behind these incredibly striking buses centres around the mythical tale of a cargo ship which was said to have been carrying one of the largest cargoes of black spiced rum ever brought out of the Caribbean. Unfortunately, the ship failed to arrive at its destination and when a search was mounted, all that was found were a few barrels of the rum - this notorious liquor was later renamed ‘Kraken’ by virtue of the fearsomely powerful mythical beast which was suspected of being responsible for the ship’s disappearance. Seafaring legend has it that the Kraken will not rest until it reclaims the lost barrels and takes them to its watery lair, leaving a trail of destruction in its wake, as it searches the ocean for its quarry, presumably suffering from quite a thick head!
These special release dual destination models are scheduled for a September release and will make for a highly collectable addition to any Original Omnibus collection.
One of the most amazing aircraft of the Second World War, Consolidated B-24 Liberator ‘Witchcraft’ completed an incredible 130 combat missions without a single mechanical abort, almost all during daylight hours
Although the Boeing B-17 is generally regarded as the most famous American aircraft of the Second World War and most definitely their most famous bomber, it was very much in the shadow of another classic aircraft, one which was quite the record setter. The Consolidated B-24 Liberator was an extremely distinctive looking aircraft, with its deep fuselage and high, shoulder mounted wing, the Liberator led the way when it came to America’s bombing offensive during WWII and would fight in every theatre of operations. Significantly, almost 6,000 more Liberators were built than Flying Fortresses during WWII, making this not only the most heavily produced American bomber of the war, but also the most produced American military aircraft in history.
With such impressive aviation pedigree as this, it will come as no surprise to learn that the Liberator has been part of the Aviation Archive range since 2003 and a hugely popular one at that. In 1/72nd scale diecast, our Liberator is a bit of a beast and some of the most recent releases have been amongst the finest in the entire range - that tradition is about to continue with the next addition to our Liberator series, as we present a scale representation of one of the most successful bombers of the European air war, a Liberator which had 130 missions to its name. The images we are showing here feature the advanced production sample of ‘Witchcraft’, meaning that this stunner is just around the release corner.
AA34019 – Consolidated B-24H-15-FO Liberator, 42-52534/Q2-M ‘Witchcraft’, 790th BS/467th BG, US Eighth Air Force, Rackheath, 14th January 1945, 100th mission completed
The afternoon of 14th January 1945 was no ordinary day at USAAF Station 145 Rackheath, in Norfolk. Thirty B-24 Liberators from the 467th Bomb Group had been allocated to take part in a raid against steelworks at Hallendorf, near Hanover and had left the base at approximately 09.00. One of the aircraft taking part in the raid was named ‘Witchcraft’ and on her return, she would set a mission record for the entire Second Air Division, one which had attracted the attention of USAAF ‘Top Brass’. As the aircraft returned to their home airfield 6 hours and 35 minutes after they took off, 42-52534 ‘Witchcraft’ landed and parked up in her usual hardstanding position, to be met by General Ketner, Commander of the 2nd Air Division and other high ranking officials, not to mention a film crew and members of the press – even the famous ‘Rackheath Band’ were in attendance. ‘Witchcraft’ had just completed her 100th credited mission without suffering a single mechanical abort, a real testament to the efforts of her assigned ground crew. Known colloquially as the ‘League of Nations’, the ground crew was led by M/Sgt Joe Ramirez, who was of Mexican heritage, with other members of his team being of Chinese, German, Dutch and American extraction. General Ketner presented each member of the ground crew with an award to mark this significant wartime achievement and a quite extraordinary bomber.
An advanced production sample of this magnificent model, we can all look forward to adding ‘Witchcraft’ to our collections in the very near future
As the air and ground crews who had participated in the ‘Witchcraft’s’ significant 100th mission without mechanical or crew illness abort posed for pictures beside an aircraft which had now taken its place in Eighth Air Force history, it was almost time for the traditional addition of another mission marking to be painted on the aircraft’s scoreboard. This honour always fell to the aircraft’s crew chief, M/Sgt Joe Ramirez, but as this day marked such a significant achievement for both the aircraft and her hard-working ground crew, he thought that a little additional decoration was in order. As well as painting the small yellow bomb symbol on ‘Witchcraft’s’ already impressive mission tally, he also added an oversized bomb above the aircraft’s distinctive port side nose artwork, with the number 100 at the side of it. Although ‘Witchcraft’ had been flown operationally by several different crews during her time in England, she was very much the property of her dedicated ground crew, who were both extremely proud and rather protective of their bomber. As their aircraft received official Eighth Air Force recognition on her significant mission achievement, there can be no doubting that this day belonged to her ground crew. Consolidated B-25H Liberator 42-52534/Q2-M ‘Witchcraft’ would end the war with 130 credited missions without suffering a mechanical abort, an achievement which was unequalled by any other B-24 in the European Theatre of operations.
Some additional information about this incredible aircraft.
Built at the Ford Motor Company’s aircraft manufacturing plant at Willow Run, Michigan at the end of 1943, Consolidated B-24H-FO15 Liberator 42-52534 was one of 8,685 B-24s made at this plant and one of 18,500 constructed by Ford during WWII. As the most heavily produced bomber of the Second World War, the B-24 made a significant contribution to the eventual Allied victory and was seen operating in almost every theatre of operation throughout the conflict.
Flown to the European Theatre via the Mid-Atlantic ferry route, it is thought that the decision to name the bomber ‘Witchcraft’ was taken by her crew during the flight and possibly during an enforced delay whilst at Natal in Brazil, due to one crew member falling ill and requiring hospitalisation. The name was painted on both sides of the aircraft’s forward fuselage, however, the elaborate artwork which really identified this aircraft may have been sketched en route, but would not be applied until after the bomber’s arrival at Rackheath, in England. The aircraft’s transit flight would actually prove to be something of an ordeal, in part due to the prevailing weather conditions, but also due to heath issues suffered by the crew. Even as the aircraft set off on the final leg of its journey to Prestwick in Scotland on 16th March 1944, the weather would force a divert to RAF St Mawgan in Cornwall. Finally arriving at US Station 145 Rackheath on 19th March, ‘The Witch’ was one of the last aircraft in the group to arrive at their new home.
Witchcraft’s first mission in the ETO took place on 10th April 1944, when bombers of the 790th Bomb Squadron were sent to strike a Luftwaffe airfield neat Bourges in France. Thankfully for the crews, this proved to be something of a ‘Milk Run’, with a strong force of fighter escorts ensuring no enemy aircraft activity was encountered. Photographic evidence exists that by mission No.2, ‘Witchcraft’ had received her full fuselage artwork, making her one of the most distinctive B-24s in Europe at that time.
Not all missions undertaken by ‘Witchcraft’ were actually credited and the criteria for such decisions can be a little confusing. Some missions which resulted in a ‘call back’, usually due to poor weather conditions over the target, were not credited as a mission for the crews involved, whilst it seems others were. For that reason, the mission ‘Witchcraft’ took part in on Christmas Eve 1944 may have been the 100th time she had left Rackheath fully loaded and ready to attack an enemy target, but because of several previously uncredited missions, would not be classified as her ‘official’ 100th mission. This would, however, prove to be one of the most significant bombing raids of the entire war.
A raid which was in part to support Allied defensive operations during the Battle of the Bulge, the 467th BG were tasked with hitting communications infrastructure targets around Gerolstein and Daun and were to contribute their highest number of aircraft to a single raid, some 62 B-24s, including ‘Witchcraft’. Indeed, only two unserviceable aircraft remained on the ground at Rackheath and even the group’s garishly painted assembly ship ‘Pete the POM Inspector’ took part in the raid.
Clear weather conditions allowed visual bombing of the targets from around 22,000 ft and although the Luftwaffe did put in an appearance, a strong force of escort fighters kept them well away from the bombers - it was even reported that Me262 jet fighters were operating in the area. Significantly, the mission flown on 24th December 1944 was the largest force of heavy bombers ever assembled for a single raid, with around 2000 B-24s and B-17s filling the skies, protected by at least 900 fighters. It was reported that as the lead aircraft were entering German airspace, the last bombers in the formation were only just leaving England.
Consolidated B-24 Liberator ‘Witchcraft’ would eventually complete 130 ‘credited’ missions without a single mechanical or crew illness abort, which was a record amongst Eighth Air Force B-24s. She did fly an additional seven missions, however, none of these were classified as credited missions, as the bombers were recalled before dropping their bombs on their assigned target. This incredible bomber underwent seventeen engine changes and had her tail section replaced on four separate occasions during her combat career, but still kept on flying. Perhaps the most telling statistic is that whilst flying an incredible 130 combat missions during WWII without a single mechanical abort, none of the crews who flew in ‘Witchcraft’ were lost, or even suffered injury. If you were assigned to fly in ‘The Witch’, you knew she would bring you home to Rackheath safely.
Our diecast homage to this incredible aircraft is on track for a late summer release, so it won’t be long before ‘Witchcraft’ can take pride of place in our Aviation Archive collections.
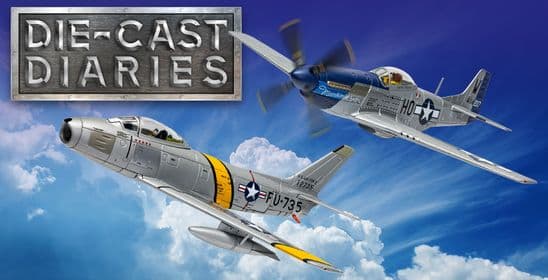
Both of our Jack Ilfrey ‘Happy Jack’s’ fighter models have now been released, a fitting tribute to a heroic WWII fighter ace of the USAAF
In a recent edition of our blog, we informed readers about a manufacturing issue which had affected the production of our 'Happy Jack’s Go Buggy' Mustang, where starboard underwing 108 gallon drop tank had been left off the model. We did promise an update on this situation as soon as we had it and that has now been posted on the Corgi website for a little while now, so for those readers who may have been affected, please use this Corgi News link to be directed to the relevant page, where you will find all the information you will need.
That is where we are going to leave this latest edition of our blog, giving you a little break from our usual warehouse sweep feature, as our teams conduct a stocktake following a particularly heavy period of ordering activity. We will return to our look at some ‘oldies but goodies’ in our next edition, where some lines we have already featured will no doubt have disappeared from our stock listings.
That’s all we have for you in this latest monumental edition of Diecast Diaries, however, you can rely on the fact that we will be back in four weeks’ time with more diecast model exclusives for your delectation. Until then, we are always interested to hear your views on all matters Corgi, especially from readers who would like to suggest a subject for future discussion within our blog, so please drop us a line.
Better still, if you would like to send us pictures of your own model collection, or details of a Corgi model release which has a special significance for you, you may even find your submission featuring in a future edition of Diecast Diaries. If you would like to feature in our blog, please send all details and photographs to our usual diecastdiaries@corgi.co.uk contact address.
Between new editions of our blog, Corgi model collecting discussions are always continuing apace on our official social media platforms - Corgi Facebook, Corgi Twitter and now Corgi Instagram, so please do pay them a visit and get involved. Don’t forget to let us know what you think about the blog and all things Corgi related.
Whenever you do decide to visit, the Corgi website is always the place where you will find out all the latest model availability information, previous editions of our blog, and all the Customer Service details you might need.
Finally, thank you for continuing to support your Corgi Diecast Diaries blog.
Our next blog is scheduled to be published on Friday 13th August.